


Projection Installation Checklist & Guidelines
The proper installation of a video projection system is critical to professionally and accurately displaying an artist's work. The following is a checklist and set of guidelines for proper projection installation.
Ceiling Mount Checklist
· Verify the desired image size and the projector throw distance (the distance between projector and screen).
· Verify that the projector can achieve the image size within the given throw distance. Consult the manual.
· Identify any potential obstructions that will affect projector mounting, such as ceiling HVAC vents or lighting systems. Identify any obstructions to the projected beam, such as hanging light fixtures, structural beams, etc.
· Before mounting the projector, ensure that the mounting surface does not vibrate. Vibration is typically caused by heating/cooling ducts that can subtly shake ceilings in certain situations.
· Ensure that heated air from ducts is not blowing on projector.
· Check that the source of power for the projector is not controlled by a light switch, as is an outlet intended for a reading lamp. Improperly switching the power off can damage projector bulbs. Projectors have internal fans that cool the bulb and components. In most cases, the larger the projector, the louder the fan. If the installation has subtle audio or is silent, the fan noise will be more audible. In addition, a small amount of light is generally emitted from the fan vent. As a solution for both problems, the projector can be placed in a separate room with a glass projection window, similar to the projection booths used in movie theaters. As always, adequate ventilation must be ensured for the proper functioning of video projectors and DVD players.
Proper installation will eliminate image distortion. Avoid keystone correction as this process may produce visible artifacts, generally most noticeable at the edges of the frame.
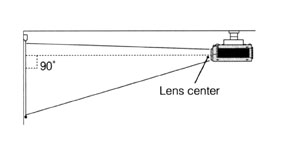
When ceiling mounting a projector, remember that not all projector lenses are center-mounted. If the lens is offset, this must be compensated for when installing the mount. Otherwise the image will be slightly keystoned.
When providing viewer seating, be sure that there is a comfortable distance between the seating and the screen. The distance from the viewer to the screen can be calculated as 1.5 - 2 times the width of the image. For example: a 10-foot-wide screen dictates a viewing distance of 15-20 feet.
Professional projector mounts are highly recommended when hanging ceiling mounted projectors. Aside from the serious issue of safety, it is simply not cost effective to make your own projector mount. Commercially available mounts provide the necessary control and rigidity lacking in even the best "home-made" mounts. Furthermore, great amounts of time are saved during installation and maintenance when using off-the-shelf mounting solutions.
Ceiling mounted projector for both front and rear projection.

Tabletop or plinth mounted projector for both front and rear screen projection.